From writing Terraform configurations to provisioning real AWS infrastructure.
Infrastructure management is an important part of Cloud and DevOps engineering. Traditionally, cloud resources can be created manually through a cloud provider's console. But what happens when infrastructure needs to be repeatable, scalable, and automated?
That's where Infrastructure as Code (IaC) comes in.
I recently completed my first hands-on project using Terraform and AWS, where I provisioned an Amazon S3 bucket, configured security settings, uploaded an object, and managed the complete infrastructure lifecycle through code.
In this article, I'll walk through what I built, how I implemented it, the commands I used, and what I learned along the way.
1. What Is Infrastructure as Code?
Infrastructure as Code (IaC) is the practice of managing and provisioning infrastructure through configuration files instead of manually configuring resources.
For example, instead of opening the AWS Console and manually creating an S3 bucket, we can define the bucket configuration in Terraform.
Terraform reads that configuration and communicates with AWS to create the required infrastructure.
Why use IaC?
- Automation: Reduce repetitive manual work.
- Consistency: Reuse the same infrastructure configuration.
- Version control: Track infrastructure changes using Git.
- Reproducibility: Recreate infrastructure when needed.
- Visibility: Review planned changes before applying them.
2. Technologies Used
Here are the tools I used for this project:
| Technology | Purpose |
|---|---|
| Terraform | Infrastructure as Code |
| AWS | Cloud infrastructure provider |
| Amazon S3 | Object storage |
| AWS CLI | AWS authentication and command-line access |
| PowerShell | Running Terraform commands |
| HCL | Terraform configuration language |
AWS Region: ap-south-1 (Mumbai)
3. Project Architecture
The workflow was straightforward:
        Local Machine
        (Windows / PowerShell)
                |
                v
         Terraform CLI
                |
                v
          AWS Provider
                |
                v
          AWS Account
                |
                v
          Amazon S3
          /        \
         v          v
    S3 Bucket   Public Access
                Block
         |
         v
     image.png
Terraform uses the AWS provider to communicate with AWS and manage the resources defined in the configuration.
4. Prerequisites
Before starting, make sure you have:
- An AWS account.
- Terraform installed.
- AWS CLI installed.
- AWS credentials configured securely.
- A local project directory.
- An image file named
image.png.
Verify your installations:
terraform -version
aws --version
Configure AWS CLI credentials using:
aws configure
Enter your IAM access key, secret key, default region, and output format when prompted.
Security note: Never commit AWS credentials to GitHub or expose them in screenshots. Use IAM credentials with only the permissions required for your project.
5. Create the Project Directory
Create a folder for your Terraform project.
mkdir terraform-s3-project
cd terraform-s3-project
Create the following project structure:
terraform-s3-project/
│
├── main.tf
└── image.png
main.tfcontains the Terraform configuration.image.pngis the file that will be uploaded to S3.
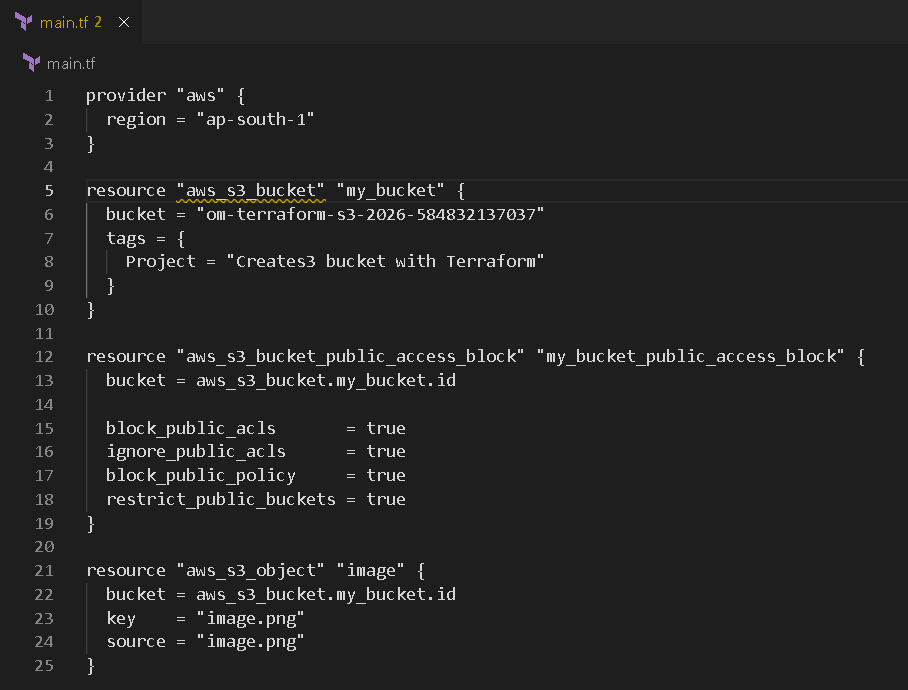
6. Write the Terraform Configuration
Now comes the main part of the project.
Create a file named main.tf.
Add the following configuration:
provider "aws" {
  region = "ap-south-1"
}

resource "aws_s3_bucket" "my_bucket" {
  bucket = "YOUR-UNIQUE-BUCKET-NAME"

  tags = {
    Project = "Create S3 Bucket with Terraform"
  }
}

resource "aws_s3_bucket_public_access_block" "my_bucket_public_access_block" {
  bucket = aws_s3_bucket.my_bucket.id

  block_public_acls       = true
  ignore_public_acls      = true
  block_public_policy     = true
  restrict_public_buckets = true
}

resource "aws_s3_object" "image" {
  bucket = aws_s3_bucket.my_bucket.id
  key    = "image.png"
  source = "image.png"
}
Replace YOUR-UNIQUE-BUCKET-NAME with a globally unique S3 bucket name.
Let's understand the configuration.
A. AWS Provider
provider "aws" {
  region = "ap-south-1"
}
The provider tells Terraform which cloud platform to communicate with.
Here, we're using the AWS provider and deploying resources in the Mumbai region.
B. S3 Bucket Resource
resource "aws_s3_bucket" "my_bucket" {
  bucket = "YOUR-UNIQUE-BUCKET-NAME"

  tags = {
    Project = "Create S3 Bucket with Terraform"
  }
}
This resource instructs Terraform to create an S3 bucket.
aws_s3_bucket: Terraform resource type.my_bucket: Local resource name.bucket: Actual globally unique S3 bucket name.tags: Metadata used to organize and identify resources.
C. Public Access Protection
resource "aws_s3_bucket_public_access_block" "my_bucket_public_access_block" {
  bucket = aws_s3_bucket.my_bucket.id

  block_public_acls       = true
  ignore_public_acls      = true
  block_public_policy     = true
  restrict_public_buckets = true
}
Security is an important consideration when working with cloud infrastructure.
This configuration enables all four S3 public access block settings.
It helps prevent accidental public exposure of the bucket through public ACLs or policies.
Notice this reference:
aws_s3_bucket.my_bucket.id
Instead of manually entering the bucket ID, Terraform references the bucket resource created earlier.
This also establishes a dependency between the resources.
D. Upload an Object to S3
resource "aws_s3_object" "image" {
  bucket = aws_s3_bucket.my_bucket.id
  key    = "image.png"
  source = "image.png"
}
This resource uploads a local image file to the S3 bucket.
bucket: Destination bucket.key: Object name inside S3.source: Local file path.
Terraform manages this upload as part of the infrastructure configuration.
7. Initialize the Terraform Project
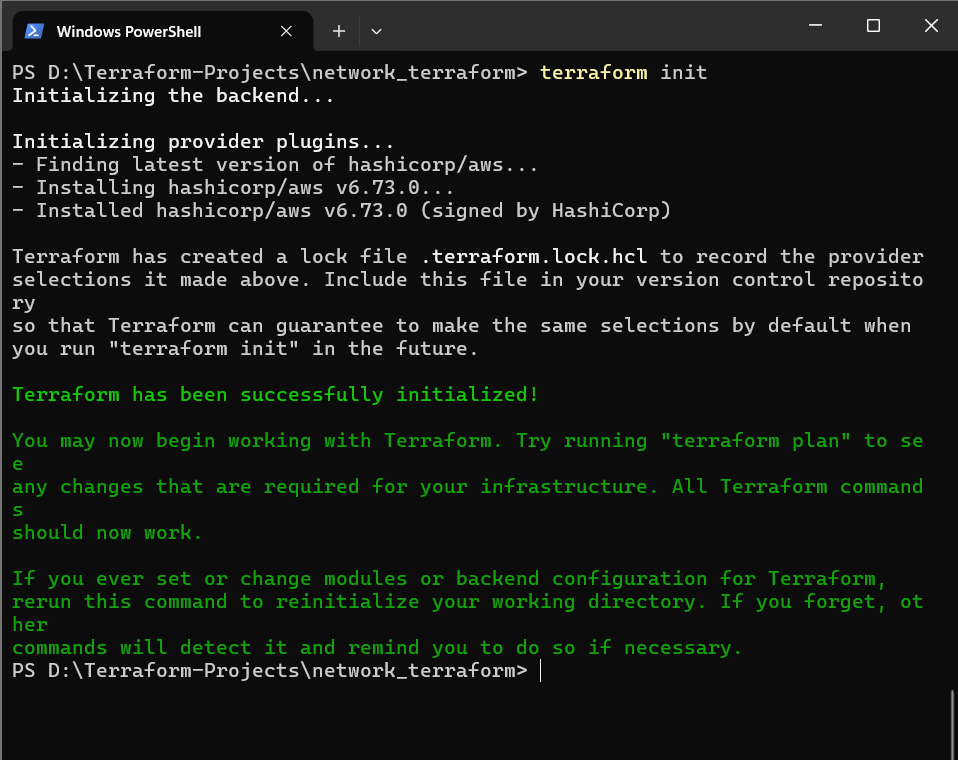
Once the configuration is ready, initialize Terraform.
terraform init
What happens during initialization?
- Terraform identifies the required providers.
- Downloads the AWS provider.
- Initializes the working directory.
- Prepares the project for further Terraform operations.
This command is generally the first step when setting up a new Terraform project.
8. Format and Validate the Configuration
Before provisioning resources, format and validate the configuration.
Format the code:
terraform fmt
This automatically formats Terraform files into a consistent style.
Validate the configuration:
terraform validate
This checks whether the Terraform configuration is syntactically valid and internally consistent.
A successful validation means the configuration passed Terraform's validation checks. It does not guarantee that AWS permissions or every resource operation will succeed.
9. Preview Changes Using Terraform Plan
This was one of the most important learning points in my project.
Run:
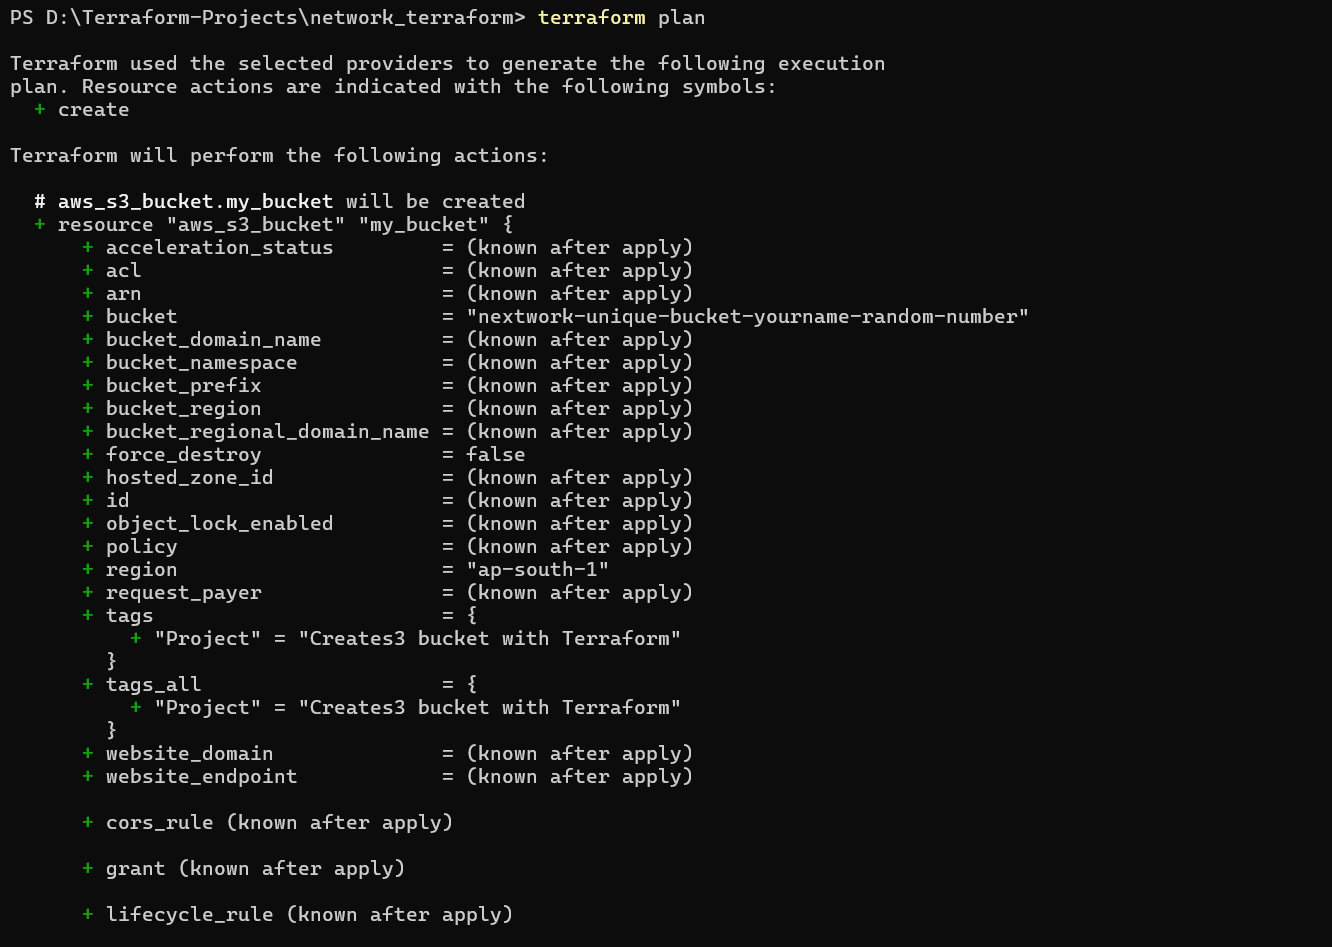
terraform plan
Terraform compares the desired infrastructure configuration with its current state and generates an execution plan.
It shows which resources Terraform intends to create, update, or destroy.
For example:
Plan: 2 to add, 0 to change, 0 to destroy.
The exact result depends on the current configuration and existing Terraform state.
Why is terraform plan important?
It gives engineers an opportunity to review infrastructure changes before applying them.
This is particularly useful in production environments, where unexpected infrastructure changes can cause outages or security issues.
10. Deploy Infrastructure Using Terraform Apply
After reviewing the execution plan, deploy the resources.
terraform apply
Terraform displays the proposed changes and asks for confirmation.
Type:
yes
Terraform then communicates with AWS and creates the requested resources.
In my project, the initial deployment created:
- One S3 bucket.
- One S3 public access block configuration.
After adding the S3 object resource, I ran terraform apply again to upload the image.
The final infrastructure consisted of three Terraform-managed resources.
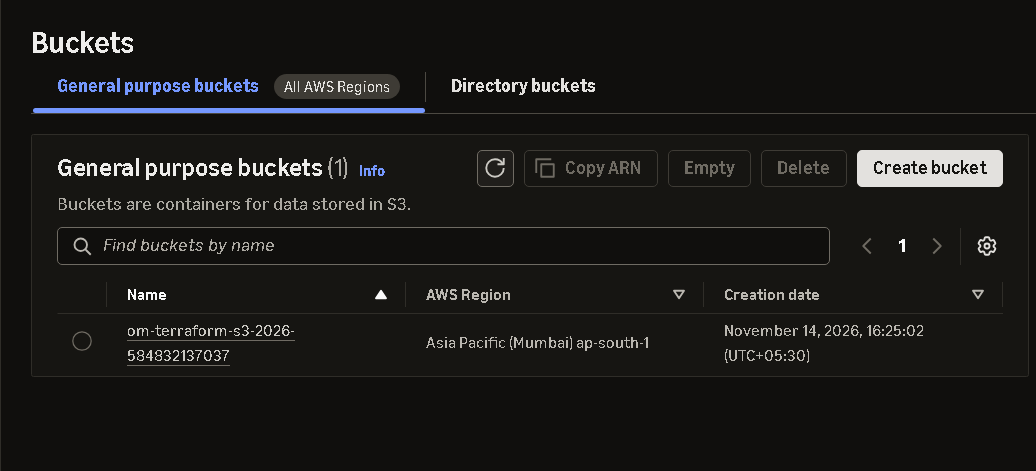
11. Verify Resources in AWS Console
After deployment, I checked the AWS Management Console.
Navigate to:
AWS Console → S3 → Buckets → Your Bucket
Verify that:
- The bucket exists.
- The bucket is in the expected AWS region.
- Public access protection is enabled.
- The uploaded
image.pngobject is visible.
This step helped me connect the Terraform configuration with the actual AWS resources created.
12. Troubleshooting: AWS Credentials Error
During the project, I encountered an error:
No valid credential sources found
This happened because Terraform could not find valid AWS credentials.
Terraform needs authentication to communicate with AWS.
I resolved the issue by configuring AWS CLI credentials correctly.
I also verified the AWS identity using:
aws sts get-caller-identity
This command helps confirm which AWS identity is being used.
Key learning: Installing Terraform and configuring an AWS provider is not enough. Terraform also needs valid AWS authentication and appropriate IAM permissions.
13. Destroy Infrastructure Using Terraform
After completing the project, I wanted to clean up the resources to avoid unnecessary AWS charges.
I used:
terraform destroy
Terraform identifies the resources it manages and displays a destruction plan.
After reviewing and confirming the operation, it deletes the managed resources.
In my case, Terraform successfully destroyed all three resources.
Important: terraform destroy deletes infrastructure managed by the current Terraform state. Always review the destruction plan before confirming, especially in shared or production environments.
14. Complete Terraform Workflow
Here is the complete workflow I followed:
1. Write Configuration
        |
        v
2. terraform init
        |
        v
3. terraform fmt
        |
        v
4. terraform validate
        |
        v
5. terraform plan
        |
        v
6. terraform apply
        |
        v
7. Verify in AWS Console
        |
        v
8. terraform destroy
Each command serves a different purpose in the Terraform infrastructure lifecycle.
15. What I Learned
This project helped me understand several important Terraform concepts:
- How Terraform providers connect to cloud platforms.
- How to define AWS infrastructure using HCL.
- How Terraform resources are declared.
- How resource references establish dependencies.
- How to configure S3 public access protection.
- How Terraform uploads and manages objects.
- Why execution plans are important.
- How Terraform authenticates with AWS.
- How to manage the infrastructure lifecycle.
Most importantly, I got practical experience moving from writing configuration files to managing actual cloud resources.
16. What's Next?
This project was my starting point with Terraform.
My next learning goals are:
- Terraform Variables and Outputs.
- Terraform State Management.
- Remote Backend using Amazon S3.
- Terraform Modules.
- Building AWS networking infrastructure using Terraform.
- Deploying one of my own applications using Terraform.
The long-term goal is to move towards reusable, automated, and production-oriented cloud infrastructure.
Final Thoughts
Infrastructure as Code is more than just writing configuration files.
It's about making infrastructure repeatable, manageable, and easier to automate.
This project gave me a practical understanding of how Terraform interacts with AWS and how cloud infrastructure can be managed through code.
One project completed. Many more to build.
If you're already working with Terraform in production, I'd love to know:
What's the first best practice you recommend learning after the basics?
Thanks for reading!
Connect with me: https://www.linkedin.com/in/omkanse/
About the author
- Backend Engineer at Fintech Company. Building secure fintech systems with OAuth2, JWT, AWS, and Kafka. Writing about backend engineering, authentication, and production systems.
Comments
Join the discussionNo comments yet. Be the first to comment.
